Java FX Bindings
The graphic style of JavaFX is already quite nice. The architecture of JavaFX applied the lessons learned from the earlier Java framework AWT and Swing.
One of the other important innovations are the JavaFX bindings. They provide an elegant way to distribute dynamic information throughout a GUI application, and help separating business and GUI code.
The concept of bindings relies on the Observer Pattern, which says that a change producing instance can inform an interested party about a change that happenend.
The classic observer pattern informs all of its Observers, or Listeners immediately of and change. The JavaFX approach is to relax a bit and take the Lazy approach. Being lazy is good, because avoiding work that is (not yet) needed is a way to reduce work and in the end speed up an application.
tubmling dominos. source stkinfo.com
 The idea is to only invalidate a value when a change happens, and only start the computation when some one
actually needs the result, for instance the GUI layer that needs to do a redraw.
The idea is to only invalidate a value when a change happens, and only start the computation when some one
actually needs the result, for instance the GUI layer that needs to do a redraw.
Since Observables can be chained, changing one value may trigger a whole avalanche of computations.
In JavaFx, it is still an avalanche, but of invalidations, and no computations. The computation is only done
when some one needs the result.
JavaFX defines so called Properties in the javafx.beans package and its sub-packages javafx.beans.properties and javafx.beans.bindings.
The Oracle tutorial by Scott Hommel sheds some light on the matter.
The Bindings and Properties packages provide several ways to create bindings, including expressions of various types, with specialized properties for int, long, and double as the most important specializations.
Binding APIs
    IntegerProperty num1 = new SimpleIntegerProperty( 1 );
IntegerProperty num2 = new SimpleIntegerProperty( 2 ); NumberBinding sum = num1.add( num2 ); 1
System.out.println( sum.getValue() );
num1.set(2); 2
int result= sum.getValue(); 3
System.out.println( result );- Creates the binding but does NOT compute anything
- Set the value, and invalidates the value, so observers must recalculate.
- The get is the observer’s action that actually triggers the actual computation.
    NumberBinding sum = Bindings.add(num1,num2); 1
    System.out.println(sum.getValue());
    num1.setValue(2);                            2
    int result= sum.getValue();                  3
System.err.println( result );- Creates the binding but does NOT compute anything
- Set the value, and invalidates the value, so observers must recalculate.
- The get is the observer’s action that actually triggers the actual computation.
IntegerBinding sum( IntegerProperty n1, IntegerProperty n2 ) {
    return new IntegerBinding() {      1

        {                              2
            super.bind( n1, n2 );
        }

        @Override
        protected int computeValue() { 3
            return n1.get()+n2.get();
        }
    };
}- Anonymous inner class with
IntegerBindingas super class. - Anonymous 'constructor' that tells the binding what its dependencies are.
- The computation, which can be arbitrarily complex, and is only executed if
some one ask the super for get(), which will then invoke
computeValue(). Note the use of protected, so this method is only callable from within the hierarchy between the IntegerBinding and its anonymous sub class. computeValue is the only abstract method in abstract class IntegerBinding.
Warning:
Quite often, and certainly when dealing with a GUI, you need to translate the values of a binding into
its String representation. In this case toString() does NOT cut it.
What you need is a StringBinding that is created
from the Binding you want to show as text. That is what public StringBinding asString() in the Binding framework is for.
Unbinding DoubleBinding dependencies
There are use cases where you have to unbind bindings. One such use case is the exercise FXTriangulate.
The DoubleBinding abstract class implements javafx.beans.binding.Binding, which states in its doc that the getDepencies() method should not be used
in production code. We therefore will us a simpler approach.
Since the protected# bind(…) and protected unbind() methods both take a varargs argument, which is an array in disguise,
the only thing you can do is to remember all bound bindings and
when you have to unbind one, unbind all and then rebind the remaining.
This appears the most reliable method.
The binding and unbinding is necessary to make the binding listen to its dependencies.
class ModifyableSumBinding extends DoubleBinding {

    Set<ObservableDoubleValue> values = new HashSet<>();

    @Override
    protected double computeValue() {
        double result = values.stream()
                .mapToDouble( ObservableDoubleValue::get ).sum();
        return result;
    }

    void add( ObservableDoubleValue v ) {
        unbind( values.toArray( ObservableDoubleValue[]::new ) ); 1
        values.add( v );
        bind( values.toArray( ObservableDoubleValue[]::new ) );
        invalidate();
    }

    void remove( ObservableDoubleValue v ) {
        unbind( values.toArray( ObservableDoubleValue[]::new ) );
        values.remove( v );
        bind( values.toArray( ObservableDoubleValue[]::new ) );
        invalidate();
    }
}
Collection.toArray(IntFunction<T[]> generator)is a method introduced in Java 11.
Caching bindings
Creating bindings is powerful but can still lead to a performance bottleneck. If you create bindings willy-nilly, it might very well be that the same computation is done at several places and in a GUI screen redraw at almost the same time (or at least the reason) too.
To mitigate that problem, it can be wise to cache a binding once it’s created, and serve out the same binding on each subsequent call. A binding can have many Listeners, and it will dutifully inform all of them with either an invalidation call or change event. The Bindings themselves cache the value of the (last) computation and serve that out until it is 'discarded' on an invalidate call.
    DoubleBinding lengthBinding( Line aLine ) { 1
        return lengthBindings
            .computeIfAbsent( aLine,
                l -> lengthBinding(
                      l.startXProperty(),
                      l.startYProperty(),
                      l.endXProperty(),
                      l.endYProperty()
                )
            );
}- We use the line object as key in the map
A naive approach to caching is to inspect a value for null and then instantiate one value when it is. In this case, because both the creation of the cache entries and the retrieval of the vale take place on the event thread, this naive approach works.
   /**
    * Cache for area binding.
    */
   private DoubleBinding areaBinding = null;

   /**
    * Create a binding to compute the area with a triangle determined by side
    * lengths a, b and c. This method consults the cache
    * and has the value computed if required.
    *
    * @return the area binding
    */
   final DoubleBinding areaBinding() {
       if ( areaBinding == null ) {
           areaBinding =
               areaBinding(
                   distanceBinding( redCircle, greenCircle ), 1
                   distanceBinding( greenCircle, blueCircle ),
                   distanceBinding( blueCircle, redCircle )
                );
       }
       return areaBinding;
   }
// method that creates the binding is left as an exercise- Compute the binding if not yet available.
Warning:
The approach of inspecting a value for null and then instantiating a new object when null is NOT threadsafe. The approach works in this case, because it all happens on the event thread, on the same thread, so there will be no interfering threads.
Using SceneBuilder
When using SceneBuilder the idea is that you design the scene using SceneBuilder, which effectively is a what you see is what you get FXML editor. The JavaFx, more specifically the FXML part builds the graphical components or even the complete UI from such FXML files.
You can have multiple FXML files per application, much like you can have many scenes in a move or stage play.
There are various demos on Scenebuilder on youtube.
Creating or updating the java controller from the FXML file.
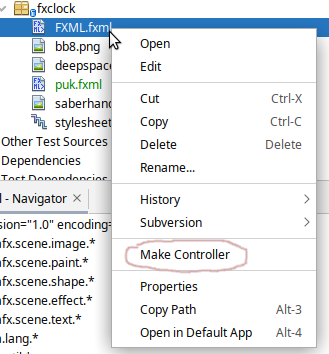 One of the most valuable tips from one of those videos is the fact that you can start with
scenebuilder and define your graphical components and methods in SceneBuilder and hence in the
fxml file and that then NetBeans IDE can generate or update the controller for you.
Working in this way can help you avoid typing or (different) spelling errors.
One of the most valuable tips from one of those videos is the fact that you can start with
scenebuilder and define your graphical components and methods in SceneBuilder and hence in the
fxml file and that then NetBeans IDE can generate or update the controller for you.
Working in this way can help you avoid typing or (different) spelling errors.
Defining Widgets using FXML
You can use FXML to define whole scenes for your application, but also to make your own specialized components. You can then layout them as you want and import them into SceneBuilder, where they behave like any other widget already available. This allows you to extend the available choices, and make special widgets that can play nicely with something like a game or a planning application.
When you want to define your own component, you have to make a few changes to the FXML file and have the component class load the FXML by itself.
<AnchorPane id="AnchorPane" fx:id="root" prefHeight="564.0" prefWidth="535.0" stylesheets="@stylesheet.css"
  >
</AnchorPane>fx:root. Example from FXTriangulator exercise.<fx:root type="javafx.scene.Group" xmlns="http://javafx.com/javafx/16"
xmlns:fx="http://javafx.com/fxml/1"
>
<Circle fx:id="redCircle" centerX="10.0" centerY="10.0"
fill="RED" radius="5.0" />
<Circle fx:id="greenCircle" centerX="400.0" centerY="10.0"
fill="GREEN" radius="5.0" />
<Circle fx:id="blueCircle" centerX="10.0" centerY="400.0"
fill="BLUE" radius="5.0" />
<Circle fx:id="centerCircle" fill="GREY" radius="5.0" />
<Line id="redLine" fx:id="redLine" endX="10.0" endY="400.0"
startX="400.5" startY="9.5" stroke="RED" />
<Line id="greenLine" fx:id="greenLine" endX="10.0" endY="400.0"
startX="10.0" startY="10.0" stroke="GREEN" />
<Line id="blueLine" fx:id="blueLine" endX="10.0" endY="10.0"
startX="400.0" startY="10.0" stroke="BLUE" />
<Label fx:id="redLabel" text="a" />
<Label fx:id="greenLabel" text="b" />
<Label fx:id="blueLabel" text="c" />
<Label fx:id="areaLabel" text="" />
</fx:root>From the FXML file you can infer that the widget (in this case) is a specialized java.fx.Group. It can be any type that is a subclass of Parent (including Parent), if you want the widget to have sub-components.
Then in the Java file that is both controller and the subclass of the component you want to specialize, Group in the example.
public class Triangulator extends Group implements Initializable {

    @FXML
    Circle redCircle;
    @FXML
    Circle blueCircle;
    @FXML
    Circle greenCircle;


// stuff left out
    Triangulator( BindingBusiness bb ) {
        this.bb = bb;
        FXMLLoader fxmlLoader =
           new FXMLLoader( getClass().getResource( "triangulator.fxml" ) ); 1

        connectLoader( fxmlLoader ); 2

        try {
            fxmlLoader.load();
        } catch ( IOException exception ) {
            throw new RuntimeException( exception );
        }
    }

    final void connectLoader( FXMLLoader fxmlLoader ) { 3
        fxmlLoader.setRoot( this );
        fxmlLoader.setController( this );
    }

// more stuff left out
}- Load the widgets fxml definitions. This will insert all @FXML annotated fields and would attach the actions to the @FXML annotated methods.
- Connect this to the loaded FXML document.
- Use a final or private method to set the root and controller of the loaded object to this, to avoid the warning of exposing this in the constructor.
In the example widget we have three dots connected with lines. The dots are draggable, while the lines stay connected. The lengths can be computed using Bindings and are thus automatically updated, and are shown next to the lines.
We will use such a widget in the next example.
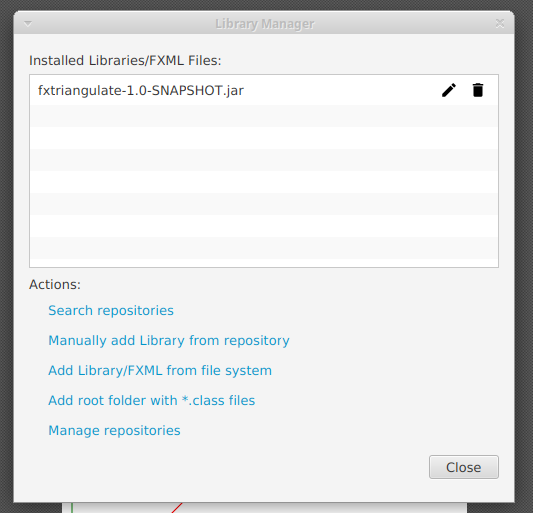
Library settings hidden behind a cog-wheel.
 Importing into scenebuilder is then done using the tiny cog next to the search text-field labeled Library. When you choose Jar/FXML Manager, you can add
widget libraries like you would with maven or point at a library on you machine.
Importing into scenebuilder is then done using the tiny cog next to the search text-field labeled Library. When you choose Jar/FXML Manager, you can add
widget libraries like you would with maven or point at a library on you machine.
Reading
- Horstmann Core Java, Ed 11, Vol II, Ch 9, Bonus Chapter Volume I on JavaFX
More Links
- openjfx landing page and fxdocs
- JavaFX at Oracle
- An excellent site at Jakob Jenkov’s JavaFX Tutorials
- Dirk Lemmerman’s blog on JavaFx is an treasure trove on advanced JafaFX usage.
- Both Jakob and Dirk have a presence on youtube too.