week 3
We’ll cover the following topics this week:
- Testing a REST application
- Testable Design
- Mocking and Stubbing
REST API end-to-end testing
Last week we discussed REST interfaces and up to now we have been unit testing and testing manually. Sometimes we want to test the whole system (end-to-end), to see if all different parts work together.
This week, when the project 2 starting-point repository was shared with you, you will also see an example of how you could set up your tests.
REST-assured
In the repository we use a library called REST Assured that can help you with this. It is a Java library that provides a domain-specific language (DSL) for writing powerful, maintainable tests specifically for REST APIs. The syntax uses 'given-when-then' to describe the test steps - which is very similar, but a bit more explicit compared 'arrange-act-assert' in unit testing and makes it easy to read.
link to official documentation: https://rest-assured.io/
Test containers
Since we need to test the whole system, we need to have a database running. We could use a real database, but that would make our tests slow and dependent on the database. Instead, we can use a library called Testcontainers that can start a real database in a docker container for us. This way we can have a real database running, but it is isolated and we can control it from our tests.
Hint: you can also add a initialize the database container with a script, so you don’t start with an empty database.
link to official documentation: https://java.testcontainers.org/
Design and end-to-end testing
End-to-end tests tend to be slow, hard to maintain, can be flaky and give less precise errors. Therefore, it is important to have many isolated tests, to catch the bugs early and to make sure that the different parts of the system work as expected.
Isolated tests, have the advantage (besides being more scalable), that they put pressure on the design of your application: In order to test a class in isolation, you need to make sure that the class is loosely coupled with other classes. This is a good thing, because it makes your code more modular and easier to maintain.
So, by TDD-ing, we don’t only get feedback on the behavior of the code, but also of the design of the code - You could say "if its hard to test, we didn’t build it right".
If you’re interested, an interesting resource on how the way you test impacts your design (and vice versa): https://blog.thecodewhisperer.com/permalink/integrated-tests-are-a-scam or https://www.youtube.com/watch?v=fhFa4tkFUFw&t=13s by J.B. Rainsberger
Test-ability
A very important non-functional requirement of good software is test-ability.
A program that is not testable is not maintainable, because it takes a lot of effort to find out whether a change in the code has broken something else. *
What makes software testable?
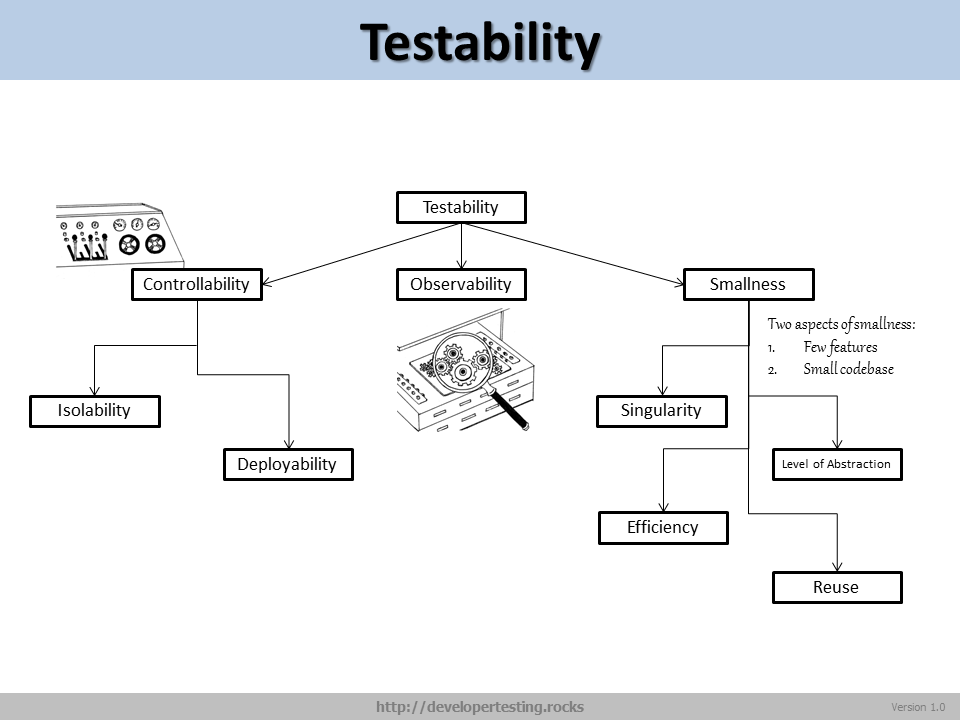
- Controllability: How easy is it to bring the system in a state where you can test it?
- Observability: How easy is it to see what the system is doing?
- Smallness: How small is the system that you’re testing?
Some examples where we have already seen test-ability in action. In PRC1, we already learned: - In PRC1 we have seen that the UI is separated from the business logic. This allows us to test the business logic without the need of actually interacting with the UI. The same goes for the database, we can test the business logic without depending on the data in the database. (Controllability) - We learned to never do nothing when we catch an exception. This allows us to test the exception handling in our code. (Observability) - We learned to split up our code in small methods. This allows us to test the methods separately. But also to reuse the methods in other parts of the code to prevent having to test (and maintain) the same code in multiple places. (Smallness)
Writing test-able code
One first easy setup is to use package private visibility more often. It is actually the default in java, and with reason. When you then put your unit test in the same package (but it its own source tree), you can have the test class look at or use the package private members of the class in its assertion or verification very easily. Keep in mind the test should be coupled to the behavior of the class, but as little as possible to its implementation details.
Test-ability is also improved by using the design rule program against interfaces, not concrete classes.
If you do that in your design, you can very easily make specialized implementations of those interface methods that you need in your test, to provide
those specific values or reactions that you need in your test, without having to jump through a lot of hoops to get the test set up.
This easy setup is where Mockito comes in.
It is not the business' business to worry about:
persistence
where service come from or who implements them.
By injecting or otherwise providing the business with the services it needs makes the business code testable without making it dependent or even know the actual implementing classes. And that is really all that counts. The business code makes the application valuable, the rest is either plumbing or already available code.[1].
Warning:
Never let the business code create its own persistence or or service object. You would loose control over what flows between service and business class, and makes it unobservable, which is bad from the testing standpoint.
Instead hand the service or resource to the business, or give it some provider of a resource.
Business class fit for testing
We’ll further explain this concept in class and in the context of PRJ2. There are quite some design ideas behind it, so don’t worry if you don’t understanding it immediately.
Let us look at an example as a class diagram.


In the picture above you see a class diagram which shows a detail in which a business class 'lives' in an environment that is designed to make sure the business class sticks to its business:
Dealing with business entities such as customers and products.
Uses services to do the business' bidding, such as saving stuff to a database,
provided as a service to the business class.
And the business code NOT responsible for how to show things in a UI.
In the above example we provide a factory or provider of the services that the business code requires.
The business class appears in two worlds:
- A business world, the Application. This is the actual use and role in the whole application. In that world there is a so called Assembler, that stitches the parts of the application together and sets it on its way. Typically this Assembler role is what the main class in a project does. Find the parts, put them together, and put them to work.
- In the Test world, call it the laboratory or business.[2] school, where the business class is trained and tested. Here the test class does the assembling with a dash of Mockito to get good grips on what goes into and out of the business class.
Before the business class can used in real life, it has to be trained and tested. Feels a bit like a student right?
You should note the arrows in the diagram. They provide direction and make it the diagram a directed graph,
and lets a dependent point to a depends-on, like
the BusinessClass depends on a Service, which is an abstract class or better still, an interface.
Also note that the service does not point to, or is dependent on the business, which is good, because it makes the service reusable in other contexts.
The service implementing classes are dependent on the Service definition which is shown with the "implements arrow", pointing from sub to super type.
In the business school, there is a test class, that creates instances of the business class and hands it implementations of the services the business needs, but does that by giving it a specialized service factory that produces mock service implementations. The business class is NOT aware of that. It uses the service in the way it is programmed, which allows the test class to verify that that programming is correct. The test class is in complete control and can also give the business class situations that are extensions to the normal happy path to ensure that those situations are also handled properly. If that sounds like an exam setting at school, you would be right.
You can tell these worlds in the class diagrams apart by the fact that one has a pink BusinessTest class with test methods.
In the 'normal' non-testing Application world, the design has taken some provisions to make sure the business class can work in both worlds. To provide the business class with a factory from which it can obtain Service implementations, a so called Assembler is added. This Assembler, in the figure at the top of the application class diagram, typically creates or instantiates the business class and provides it with all it needs, in this case an implementation of a ServiceFactory. Note that the assembler in this case also creates the UI part. In desktop applications this is the responsibility of the Main class of the application.
This approach of providing an instance of some class implementing an interface or realizing an abstract class to a business class that needs it is called dependency injection.
Dependency injection is providing the services required by some class by means of constructor parameters, setters or otherwise, to avoid that the dependencies of the class are created by that class itself.
Faking as a testing technique
"When you can’t or won’t make it, Fake it"
Let’s revisit the movie making metaphor. We know that almost everything in that industry is fake, or maybe more politely make-belief. In that it only needs to look convincing without being the real thing. So for instance, when someone needs to be hit hard in the face, it will not really be done and to make sure nothing untoward happens to the expensive actors, they may be replaced by stunt men and women, so the punch will never land on the pretty face.
In our industry we have other reasons to not use the real thing.
- It is not available (yet).
- It is expensive (as in slow) to use and we want our tests to be quick.
- We want to test behavior under circumstances that are rare, and difficult to achieve with the real thing.
- It is inconvenient to use.
What we do is replace the "Dependent On Components" by so called mocks.
In all cases, the System Under Test (SUT), the class we are testing is always used as is. So we have no stunt doubles for our protagonist.
When testing, we want it to take all the punches, because we want to make sure it can handle them.
Caution:
A very common mistake made when using mocking as a testing technique, is faking the protagonist or SUT. This is very wrong. What you are testing in that case is the mock, not the class you hope to test. None of the code of the SUT will be used in such tests.

Suppose you have an application in which one of the required effects is that a business class prints something to a printer. Turning this into a test will give you a hard time, because you have to run between your desk an printer, but hey, it will improve your fitness.[3].
To verify that the system under test (SUT) does indeed use the printer, make that fact observable, so that you can verify that the printer call has been made. You can use a trick common to many informatics problems and is available to you too: add a level of indirection, or do not give the actual printer to the business class but instead something that the business code thinks it is a printer and replace that with whatever suits you for the test.
 'Nice' you say, now I have two problems':
- change the application and
- create a printer just for my tests.
Stay cool, have a Mockito.

You are not the first developer in this situation, so someone has automated the creation of 'fake' objects or mocks for us:
Mockito is a framework that can create various objects that are useful for testing.
Mock is an object that behave like a (alternate) implementation of a class or interface. This is akin to an actor (or actress) or stunt-double that
behaves exactly like you tell it to. A mock also saves any method call that you do on it.
Stub just holds data that you provide and are presented to the SUT.
Both mock and stub are stand-ins for dependent on components (DOC) or collaborators for the SUT.
There is also a
Spy which is in fact a wrapper around an actual implementation, that allows you to observe what goes in (method call+ parameters) and comes
out of (return values) of the real object while it is used by the SUT. You can make the spy only spy on certain method calls, and leave the rest unchanged.

Lets see what this looks like in code.
public interface Printer {

    void println( String print );

    /**
     * Make it deal with objects too.
     * @param o to print.
     */
    default void println( Object o ) {
        printLn( o.toString() );
    }
}
Now over to the test class, which creates a mocked printer and hands it to the Business class.
    @Test
    public void doesItPrint() {
        Printer pr = mock( Printer.class );  1

        Business b = new Business( pr );     2

        b.work();                                 3

        verify( pr ).println( anyString() ); 4

}- Create the mocked printer.
- Create a Business object passing it the printer.
- Make the business class work.
- Ask the mocked printer if it was used.
This is of course a simple test and the only thing that it verifies is that the printer.printLn(String) has been used.
@Mock
Printer printer; 1

Business business;

@BeforeEach
void setup() {
    business = new Business( printer );  2
}

@Test
void doesItPrintBusiness() {
    var lineCaptor = ArgumentCaptor.forClass( String.class ); 3

    business.work( "Linda" ); 4

    verify( printer ).println( lineCaptor.capture() ); 5
    assertThat( lineCaptor.getAllValues() ).contains( "Hello Linda" ); 6
    //  fail("test does It print ended. You know what to do.");

}- Setup mock as annotated field.
- Create the business (SUT) object in a setup method, so tests can avoid repeating this,
again passing the printer object via the business constructor. - Prepare a Mockito helper object to capture the data passed to the printer.
- Make business do its thing.
- Verify that
printer.println(…)is called. The captor object is used to collect all that has been received by the printer’sprintLnmethod. - The expected data is passed to the printer, so a real printer would
print it. The method
lineCaptor.getAllValues()produces a List of the captured things, strings in this case.
Mockito is well documented with lots of examples in its java doc. When you look to the test dependencies of your Maven project in NetBeans-IDE, right-click on the mockito dependency, then download the javadoc, you can enjoy that while you are developing.
To Mock or To Configure
Sometimes the class that you want to pass as a mock to the business code has a big interface, with many methods, and you do not want to restrict the business code to just a few trained methods. That would constrain the methods that the business class could use, which serves no real purpose. In such cases it may be better to provide a differently configured real class.
Input stubbing with a real class.
An object that contains pre-configured data is called a Stub.
As an example: Assume your business class uses a Scanner as it’s input.
Scanner has 50-odd methods, which you certainly do not want to train all when mocking.
But since you will pass a special Scanner to the business class anyway, the better way is to use a Scanner configured with one of
it’s constructors.
In this case use new Scanner( String s ), in which the string s contains exactly the input you want to use in your test. The string can contain newlines, so that it appears as if the user entered multiple lines. This allows you to test a program with a dialog.
Something along the line of new Scanner("12\n13\n");, that is '12', 'newline', and '13'.
Output mocking with a real classes
THIS PARAGRAPH DESCRIBES AN ADVANCED TOPIC THAT YOU DON’T NEED IMMEDIATELY. FINE IF YOU UNDERSTAND IT, IF NOT THEN JUST CONTINUE WITH THE NEXT PARAGRAPH ABOUT TESTABLE DESIGN.
For the output side something similar is in effect. The most common way of outputting something
is to use System.out to print or otherwise output the results of the program. But System.out is
just a PrintStream, which also has a lot of convenience methods with a total of 33 methods and 10 constructors.
You do not want to restrict the use of any of its methods in the business class.
The trick here is to use one of the constructors to given PrintStream something to 'print on', which you can inspect afterwards. Usage: The business class has a constructor.[4] or setter to take a PrintStream and always uses that to print to, if it needs to print anyway.
class PrintingBusiness
      final PrintStream out; 1

      PrintingBusiness() { 2
          this( System.out );
      }

      PrintingBusiness( PrintStream ps ) { 3
          this.out=ps;
      }

      void businessMethod(){
          out.format( "%s at %d", "Oplegkaas", 957 ); 4
      }
}finalto have a constructor set it- Default constructor uses System.out to print to and forwards it to the next constructor.
- Redirect output to other output, for test or 'printing' in a GUI.
- All facilities of PrintStream are available, including formatted printing.
    @Test
    public void tformattedPrint() {
        ConsoleOutput cout = new ConsoleOutput();
        PrintStream out = cout.asPrintStream();

        out.format( "%s at %d", "Oplegkaas", 957 );

        assertThat( cout.toString() ).contains( "at", "Oplegkaas", "957" );
    }
By implementing the AppendAndClear interface you can print to anything, for instance
by using a StringBuilder as intermediate carrier and then transfer the output to a GUI element in JavaFX or Swing.
@FunctionalInterface
public interface AppendAndClear {

    /**
     * Append a string to this AppendAndClear.
     *
     * @param toAppend text to add.
     */
    void appendText( String toAppend );

    /**
     * Clear the output. Optional operation.
     */
    default void clear() {
    }
}package consoleoutput;
import java.io.ByteArrayOutputStream;
import java.io.IOException;
import java.io.OutputStream;
import java.io.PrintStream;
import java.nio.charset.Charset;
import java.nio.charset.StandardCharsets;
/**
* Test helper, to be able to redirect a PrintStream to any writable.
*
* Use case: write to string or StringBuilder for test or e.g. javafx
* TextInputControl for UI. Implement AppendAndClear (which can be done as a
* lambda) and you're set.
*
* @author Pieter van den Hombergh {@code <p.vandenhombergh@fontys.nl>}
*/
public class ConsoleOutput extends OutputStream {
protected final ByteArrayOutputStream baos = new ByteArrayOutputStream();
final AppendAndClear aac;
/**
* Create a Console output copying data to given AppendAndClear.
*
* @param ta append and clear to copy all written text to.
*/
public ConsoleOutput( AppendAndClear ta ) {
this.aac = ta;
}
/**
* Without appendable.
*/
public ConsoleOutput() {
this( null );
}
@Override
public void write( int b ) throws IOException {
if ( aac != null ) {
String s = "" + ( (char) b );
aac.appendText( s );
}
baos.write( (byte) b );
}
/**
* Clear and discard output.
*/
public void clear() {
if ( aac != null ) {
aac.clear();
}
baos.reset();
}
/**
* Get the accumulated string since start or clear.
*
* @return the string
*/
@Override
public String toString() {
return new String( baos.toByteArray(), StandardCharsets.UTF_8 );
}
/**
* Factory method to get this ConsoleOutput as PrintStream.
*
* @return the print stream.
*/
public PrintStream asPrintStream() {
return new PrintStream( this, true, Charset.defaultCharset() );
}
} // eof ConsoleOutput